With Ning 3, you’re able to add multiple instances (or copies) of the Blogs feature. This allows you to have different blogs for different audiences. For example, you could publish an official network blog in one instance only you can add to, and allow members to contribute their own blogs in a separate area. Perhaps you want one blog area visible to all visitors to your network, but a private area that’s members-only and invisible to everyone else. Or maybe you want the best writers on your network to have their own featured space so you can promote their content. The possibilities are endless, and there’s no limit to the amount of blog instances you can create!
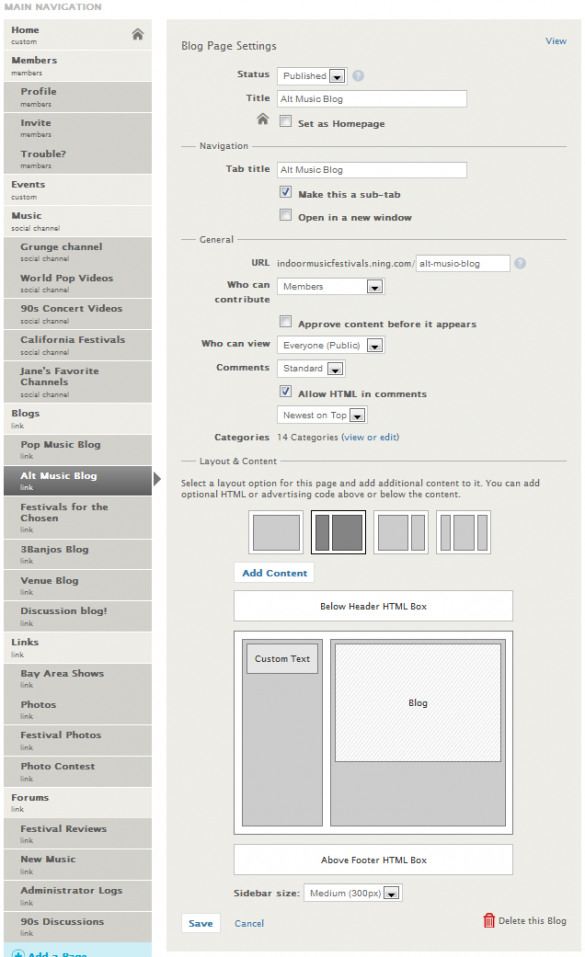
To create multiple instances of a blog, head to your network’s Social Site Builder by clicking on the link in your administrative toolbar. Create a new page. Choose “Blog” as the page type, then configure the settings for your new blog. Your new blog instance will have a customizable URL, and its privacy settings can be completely different from your original blog. You can also choose who can contribute to the blog and select a layout similar to a custom page. Once you set up your blog instance, save your changes—you can now create a second instance, or just start posting!

Comments
Each blog instance has its own settings, so changes you make to one blog instance don’t apply to other instances. For example, you may want a private blog area to have native commenting, but a publicly visible blog set up for commenting with Facebook or Disqus. The same goes for blog posts and blog categories: those that appear in one instance won’t be part of any other blog instances.
Privacy
Set your blog’s status to “Published” to make this instance live and accessible to those you’ve specified. Or, if you only want this instance to be accessible to you and administrators you’ve appointed, save it as a “Draft”. This setting is also useful for if you are not ready to go public with it yet. Then once you are ready, change the status to “Published.”
You have the ability to determine who can contribute to a blog instance. Choose “Administrators”, “Featured Members” and “Members” from the “Who can contribute” drop-down menu. Viewing permissions are open to “Everyone (Public)”, “Members”, “Featured Members” and “Administrators”.
Moderating your blog instance
When determining who can contribute, you can also choose to require content approval before a blog will appear on your network in this forum. This means that when someone (a member or featured member) creates a blog, they will see a “Pending Approval” lightbox after posting their blog, and you will see this blog post in the Content Moderation section of your network’s dashboard.
Layout & Content
Each blog instance can have its own layout, whether that’s one, two, or three columns. You can also use the “Add Content” button to insert HTML boxes in which you can enter custom text or HTML code. You can even insert widgets to display network activity, photos, or even other blog instances! If you want, you can run custom text and HTML in the header and footer areas, or select the default to run across the entire network.
Let’s start create a blog with Ning.


